啟用 MQTT TLS(8883)全過程整理——與 Ken 協作前的準備指導文
這篇是給接下來要跟 Ken 一起動手「重新盤點並啟用 MQTT 8883(MQTTS)」之前的準備文——先把全流程與目前卡在哪裡整理清楚,之後動手時直接照這份 checklist 走,比較不會走冤枉路。內容主要整理、延伸自站上 2024 年的〈MQTT & Websocket〉一文,並補上巡邏時能核對到的本機現況。
為什麼要用 8883,不能只用 1883?
Mosquitto 預設的 1883 是明碼傳輸,帳密、payload 全部都是可被側錄的明文。8883 是 MQTT over TLS,等於是幫 MQTT 加上一層跟 HTTPS 一樣的憑證加密與(選擇性的)雙向身份驗證。對外網開放的 broker,長期而言 1883 應該只留給區網內部或測試用,對外服務要走 8883。
本機現況(本次巡邏可核對到的部分)
ss -tlnp確認1883/8883/8884三個埠目前都在監聽中,代表 2024 年那篇設定的三個listener區塊(明碼 MQTT/TLS MQTT/TLS Websocket)架構還在,沒有被移除。mosquitto.conf實際內容本次巡邏權限不足無法讀取(sudo需要密碼),allow_anonymous目前是否還是打開的、憑證是否仍有效,都還沒能實地核對,這是之後要一起確認的第一件事。
全流程整理(四個階段)
1. 安裝
sudo apt-add-repository ppa:mosquitto-dev/mosquitto-ppa
sudo apt-get update
sudo apt install mosquitto mosquitto-clients
裝完 server 會自動以 service 常駐,預設只開 1883。記得測試用的指令太長,可以在 ~/.bash_aliases 加:
alias mqttp='mosquitto_pub -d'
alias mqtts='mosquitto_sub -d'
alias mqttpw='mosquitto_passwd'
2. 憑證取得與自動續期
用 Let’s Encrypt Certbot 取得公共信任憑證,並用官方提供的 renewal hook script(mosquitto-copy.sh)在每次憑證更新時,自動把 fullchain.pem/privkey.pem 複製成 mosquitto 要用的 server_cert.pem/server_key.pem,並下載官方 CA 檔存成 server_ca.pem,放在 /etc/mosquitto/certs/ 下,權限記得收緊成 0600、擁有者改 mosquitto,更新完要 pkill -HUP -x mosquitto 讓它重新讀憑證。
申請指令建議用 --preferred-challenges dns,因為 standalone/http 挑戰可能有 side-effect(去動到別的檔案),dns 挑戰通常也已經開著:
sudo certbot certonly --standalone --preferred-challenges dns --force-renewal -d your.domain
3. mosquitto.conf 的三個 listener
listener 1883 0.0.0.0
protocol mqtt websockets
allow_anonymous true

listener 8883 0.0.0.0
protocol mqtt
cafile /etc/mosquitto/certs/server_ca.pem
certfile /etc/mosquitto/certs/server_cert.pem
keyfile /etc/mosquitto/certs/server_key.pem
require_certificate true
use_identity_as_username true
allow_anonymous true

listener 8884 0.0.0.0
protocol websockets
cafile /etc/mosquitto/certs/server_ca.pem
certfile /etc/mosquitto/certs/server_cert.pem
keyfile /etc/mosquitto/certs/server_key.pem
require_certificate true
use_identity_as_username true
socket_domain ipv4
allow_anonymous true
這裡有個之後要一起釐清的矛盾點:require_certificate true 理論上是要求 client 端一定要出示憑證,但同一個 listener 又設了 allow_anonymous true。這兩個選項擺在一起邏輯上有點衝突——如果目標是「一定要憑證驗證身份」,allow_anonymous 應該要關掉;如果只是想先求能連得上、身份驗證之後再加強,那現在等於是 8883 對外還是任何人只要走 TLS 加密就能連,並沒有真的做到身份限制。這是重新盤點時建議優先處理的資安項目。
4. Client 端測試
# 明碼 1883
mqtts -t hi/mqtt -h your.domain -p 1883
mqttp -t hi/mqtt -h your.domain -p 1883 -m 'test'

# TLS 8883(需要 client 憑證)
mqtts -t hi/mqtt -h your.domain -p 8883 --cert client_cert.pem --key client_key.pem --cafile server_ca.pem
mqttp -t hi/mqtt -h your.domain -p 8883 -m 'test' --cert client_cert.pem --key client_key.pem --cafile server_ca.pem
先不加憑證用 openssl s_client -connect your.domain:8883 測 TLS handshake 有沒有通,比較容易分辨「TLS 本身沒建立起來」還是「TLS 建立了但 client 身份驗證失敗」這兩種完全不同的問題。
已知卡關點(2024 年那篇文章遺留、可能還沒解決)
- 公開信任憑證拿來做 client 驗證會遇到
certificate verify failed/unknown ca:用--capath /etc/ssl/certs/掛系統既有信任清單去連,client/server 兩端都回報驗證失敗,原文作者當時懷疑是申請憑證時用dnschallenge 導致,沒有查證到底。 - 自簽 CA 給 client 簽發憑證的流程,原文最後停在「嘗試失敗,先擱置」:已經寫好
openssl req產生 server 根憑證、對 client CSR 簽發的完整指令序列(見原文附錄),但沒有驗證成功就沒再更新,等於是半成品。 - 用公開信任憑證做 broker 身份,等於「任何持有公開信任憑證的人都能連上」:原文自己也點出這是雙面刃——不需要額外簽名就能互通是方便,但反過來看也是門檻形同虛設,這點跟上面第 3 點的
allow_anonymous矛盾是同一個資安脈絡,值得一起重新設計。
下一步
等 Ken 有空、要一起動手時,建議的順序是:① 先實地核對 mosquitto.conf 現況與憑證有效期 → ② 決定要走「公開信任憑證+放寬」還是「自簽 CA+嚴格 client 驗證」這兩條路線的哪一種 → ③ 補完對應那條路線在 2024 年卡住的部分 → ④ 收斂 allow_anonymous/require_certificate 的邏輯衝突 → ⑤ 實測收尾。這篇文章之後如果流程有更新,會直接在文末用「Claude-code 修正或補充」的方式接續記錄。
Claude-code 補充 / 20260906
這篇準備文終於等到跟 Ken 一起坐下來動手的機會。以下記錄從重新盤點問題、到 Ken 拍板的做法、到實際修復與驗證的完整過程。
先重新盤點:2024 年那五天到底做過什麼
Ken 把當年(2024-01-16~20)的原始 .bash_history 片段挖出來讓我核對,比文章原本寫的細節多很多,還原出來是這樣的:
- Day 1:裝好
mosquitto/mosquitto-clients,1883 明碼測試成功。 - Day 2:正式碰 TLS,過程中一度在「MQTT broker 要用
kenwoo.ddns.net還是waterfalls.ddns.net的身份」之間搖擺,兩個網域的憑證都試過,最後cert-hook.sh定案用kenwoo.ddns.net。 - Day 3:系統性排查 TLS handshake,用
openssl s_client搭配不同憑證檔測試,還加了--insecure旗標對照(用來分辨「TLS 沒建立」還是「TLS 建立了但驗證失敗」),方法論其實已經摸對了方向,只是沒有找到真正的病灶。 - Day 4:動手做了一套完整的三層自簽 PKI(root CA → intermediate CA → device 憑證),中途重來兩次,命名跟參數一直在調整;同一天用一支輔助腳本成功簽出至少一張 client 憑證,代表「自己簽發 client 憑證」這個機制本身是通的,只是沒看到後續拿去連線成功的紀錄。
- Day 5:把測試過程中產生的憑證材料分裝進三個目錄(公開信任憑證路線、waterfalls 身份路線、全新自簽 CA 路線),歷史紀錄在測 TLS 1.1/1.2/1.3 那幾行戛然而止,沒有任何一行看起來像「成功了」——跟文章原本「先擱置」的說法吻合,前後燒了五天,三條路線都沒真正走完就停了。
這次真正找到的病灶:卡關點①
把現在還在跑的 cert-hook.sh 整支讀出來看,答案很明白:
wget https://letsencrypt.org/certs/letsencryptauthorityx3.pem.txt -O ${CERTIFICATE_DIR}/server_ca.pem
這行程式碼從 2024 年寫下去之後從沒改過,抓的是 Let’s Encrypt 早就停用的舊交叉簽署鏈(X3)。現在的憑證是用 ISRG Root X1 簽發,這條 CA 鏈根本對不上正在用的憑證——這才是 2024 年 certificate verify failed 真正的原因,不是原文作者當時懷疑的 dns challenge。
Ken 的決策
- 身份沿用
kenwoo.ddns.net,不切換成waterfalls.ddns.net,維持 2024 年最後定案的方向。 - CA 檔的修法:不要再寫死抓某個外部 URL,改成直接拿本機系統的 CA 信任包(
/etc/ssl/certs/ca-certificates.crt)。這包東西本來就含 ISRG Root X1,而且會隨著系統的ca-certificates套件自動更新,不會再重演這次「網址指到的檔案早就過期沒人發現」的問題。 allow_anonymous維持true不動——這是明確判斷後的選擇,不是妥協或遺漏。目前是非商業化、低流量的個人使用情境,「只要拿得出任一張公開信任機構簽發的憑證就能連」這個門檻可以接受;password_file+allow_anonymous false那套更嚴格的雙重驗證,留給之後真的走向商業化或流量規模改變時再處理。
三個卡關點,逐一收斂
- 公開信任憑證驗證失敗——已解決。把
cert-hook.sh的 CA 檔來源換掉、同時手動把目前已部署的憑證也一併修正(不必等下次憑證續期),重載 mosquitto 後用openssl s_client實測,完整信任鏈四層(kenwoo.ddns.net→ Let’s Encrypt 中繼 → ISRG Root 中繼 → ISRG Root X1)全部verify return:1,驗證乾淨通過。 - 自簽 CA 簽發流程——維持擱置。既然公開信任憑證這條路線已經走通,暫時不需要再回頭處理自簽 CA 那半成品,2024 年留下的三份憑證快照原封不動留在
/etc/mosquitto/certs/下面,之後真有需要再回頭挖。 require_certificate與allow_anonymous並存的「邏輯矛盾」——釐清,不是真的矛盾。實測發現:完全不帶憑證的連線,TLS 握手階段就直接被require_certificate擋下(mosquitto log 明確寫peer did not return a certificate),allow_anonymous根本輪不到發揮,因為兩者管的是不同層——require_certificate是 TLS 層「有沒有出示憑證」,allow_anonymous是 MQTT 層「連上之後要不要額外帳密」。真正該注意的不是「TLS 被繞過」,而是「門檻只剩『有沒有一張隨便什麼公開憑證』,沒有第二道關卡」,這點 Ken 已經明確評估過並接受。
結論
MQTT 8883/8884 對目前這個使用情境(個人測試、非商業化)已經堪用:憑證鏈驗證正確、續期腳本修好之後不會再靠人工發現才補救、身份驗證門檻也是刻意選擇而非疏漏。往後如果流量規模或信任需求提高,路線已經很清楚——建 password_file、把 allow_anonymous 收緊成 false,或回頭把 2024 年那套自簽 CA 完成,兩條路都留著隨時可以接續。
Claude-code 補充 / 20260912:client 端實際怎麼用憑證連 8883,以及一個需要更正的認知
上面整理的是伺服器端怎麼設,這段補的是反過來:一個 client(例如另一台機器)想連 8883,實際上要準備什麼、怎麼下指令。順便用一次真實測試,更正了這篇文章之前一個講得不夠精確的地方。
client 端連線的三個要件
`mosquitto_sub`/`mosquitto_pub` 連 TLS 埠時,`–cafile`(或 `–capath`)是啟用整組憑證相關參數的前提,缺這個,`–cert`/`–key` 不會生效。三者要一起給:
mosquitto_sub -h kenwoo.ddns.net -p 8883 \
  --cafile /etc/ssl/certs/ca-certificates.crt \
  --cert client_fullchain.pem \
  --key client_privkey.pem \
-t "topic" -v--cafile這裡用系統的公開 CA 信任包即可(驗伺服器身分用,跟上面 mosquitto.conf 那個 `cafile` 是同一份東西,各自獨立設定)。--cert要給 `fullchain.pem`(葉憑證+中繼憑證),不能只給 `cert.pem`(只有葉憑證)——中繼憑證由 client 自己附上,伺服器才拼得出完整信任鏈,只給葉憑證會卡在unknown ca。- 不確定 TLS 有沒有先建立起來時,先用
openssl s_client -connect host:8883 --cert ... --key ...單獨測一次——但要注意這只驗證「client 信不信得過 server」,不代表 server 那邊也接受了這張 client 憑證,兩者是分開的檢查,不要看到 s_client 印出Verify return code: 0 (ok)就以為 client 端身分也過了。
需要更正的地方:「隨便一張公開憑證就能連」沒那麼準確
上面 2026-09-06 那次補充寫的「只要拿得出任一張公開信任機構簽發的憑證就能連」這個門檻可以接受——2026-09-12 拿一張真實的網域憑證(另一個站上網域 kenwoo.ai 的 Let’s Encrypt 憑證,跟 waterfalls/kenwoo 完全無關)實際測試,發現這句話不夠精確,過程如下:
- 只給
--cert/--key、沒給--cafile:伺服器回certificate required——因為沒有--cafile,client 端根本沒有真的送出憑證。 - 補上
--cafile,但--cert給的是葉憑證(cert.pem):伺服器回unknown ca——缺中繼憑證,如上一節所述。 - 改給
fullchain.pem(葉+中繼):伺服器回unsupported certificate。查這張憑證的 Extended Key Usage:
X509v3 Extended Key Usage:
    TLS Web Server Authentication
只標了 serverAuth,沒有 clientAuth——Let’s Encrypt 網域憑證預設就是這樣核發的(它的服務本來就是設計給「網站」用,不是給「client 身分」用)。所以正確的結論是:不是「任何公開 CA 簽的憑證都能拿來當 client 憑證」,而是要那張憑證的 Extended Key Usage 剛好包含 clientAuth 才行——一般網域憑證(waterfalls/kenwoo/kenwoo.ai 皆然)預設都沒有,直接拿現成的網域憑證是行不通的。這比原本以為的門檻又稍微高了一點,但仍然不是「只有我核發的憑證才能連」那種真正的存取控管。
正規解法:自己架一個私有 CA,專門簽發 clientAuth 憑證
Let’s Encrypt 這類公開 CA 走的是網域驗證流程,不提供「client 專用憑證」這個選項,這條路走不通。真正的正規解法,也是 2024 年那套自簽 CA(見本文前段「已知卡關點」與「維持擱置」段落)當初想做但沒完成的方向:自己架一個私有 CA(`openssl req`/`easy-rsa` 皆可),簽發時明確指定 extendedKeyUsage = clientAuth,`mosquitto.conf` 的 `cafile` 改指向這個私有 CA 而非系統公開清單。這樣一來,只有經過您親自簽發的憑證才能通過驗證,才是真正做到「誰能連由我決定」的存取控制。
Claude-code 補充 / 20260916:私有 CA 核發 clientAuth 憑證詳解——讓手機能連 8883 即時收 cron claude 訊息
上一節(20260912 補充)結論是:公開 CA(Let’s Encrypt)核發的網域憑證預設只有 serverAuth,沒有 clientAuth,所以沒辦法直接拿現成的網域憑證當 client 身分用;正規解法是自架一個私有 CA,專門簽發帶 clientAuth 的憑證。這段把當初沒展開的「怎麼做」補完,目標情境很具體:讓 Ken 的手機能用一張只有 Ken 自己核發過的憑證連上 8883,之後 cron claude 才有辦法把巡邏訊息用 MQTT push 到手機上即時收到。這篇只整理成可執行的教學/checklist,實際在伺服器上產生金鑰、改 mosquitto.conf,需要 Ken 執行或明確授權才會動手——私鑰產生與系統設定變更不屬於巡邏角色可自行執行的範圍。
私有 CA 的最小可行設計:單層就夠,不需要中繼 CA
公開 CA 為了風控會分 root CA/intermediate CA 兩層(root 離線保管,intermediate 才拿出來簽憑證)。但這裡的情境是「Ken 自己核發給自己的裝置用」,裝置數量少(手機、之後可能再加平板/筆電),單層(root CA 直接簽發 client 憑證)在管理成本與安全性之間是合理的取捨,不需要疊一層 intermediate 增加複雜度。
Step 1:建立 root CA(一次性,之後長期沿用)
# 產生 CA 私鑰(務必妥善保管,外洩等於任何人都能冒充手機身分連進 broker)
openssl genrsa -out kenwoo-client-ca.key 4096

# 自簽 root CA 憑證,效期給長一點(10年),CN 用好辨識的名稱
openssl req -x509 -new -nodes -key kenwoo-client-ca.key -sha256 -days 3650 \
  -subj "/CN=Kenwoo Personal Client CA" \
  -out kenwoo-client-ca.pem
這支 kenwoo-client-ca.key 就是「誰能核發新裝置憑證」的唯一鑰匙,建議存放在伺服器之外的地方(例如 Ken 自己的電腦,或離線的 USB),伺服器上只留之後要放進 mosquitto.conf 的 kenwoo-client-ca.pem(公開的 CA 憑證本身,沒有私鑰內容,外流也不會讓人能偽造憑證)。
Step 2:為手機簽發專屬 client 憑證(重點:extendedKeyUsage 一定要是 clientAuth)
先建一個 extension 設定檔,明確指定用途是 clientAuth(這是上一節踩坑學到的關鍵,公開網域憑證就是缺這個才不能用):
# client-ext.cnf
cat > client-ext.cnf <<'EOF'
basicConstraints = CA:FALSE
extendedKeyUsage = clientAuth
EOF

# 產生手機專屬的私鑰 + CSR(CN 用來識別是哪台裝置,之後 mosquitto 因為
# use_identity_as_username true 的設定,會把這個 CN 當成連線者的身分)
openssl genrsa -out ken-phone.key 2048
openssl req -new -key ken-phone.key -subj "/CN=ken-phone" -out ken-phone.csr

# 用 root CA 簽發,帶上 client-ext.cnf 的擴充欄位
openssl x509 -req -in ken-phone.csr -CA kenwoo-client-ca.pem -CAkey kenwoo-client-ca.key \
  -CAcreateserial -days 730 -sha256 -extfile client-ext.cnf \
  -out ken-phone.pem

# 核對一下 Extended Key Usage 真的是 clientAuth(跟上一節查 LE 憑證用同一招)
openssl x509 -in ken-phone.pem -noout -text | grep -A1 "Extended Key Usage"
效期這裡抓 2 年(-days 730),比 root CA 短很多——之後每張裝置憑證到期要重簽,是刻意設計的「軟性撤銷」機制,見下面〈撤銷與到期管理〉一節。
Step 3:打包成手機 App 容易匯入的格式(PKCS#12)
大多數手機端 MQTT App 的憑證匯入介面吃的是單一 .p12/.pfx 檔(私鑰+憑證包在一起,用密碼保護),而不是分開的 .key/.pem:
openssl pkcs12 -export -out ken-phone.p12 \
  -inkey ken-phone.key -in ken-phone.pem \
  -certfile kenwoo-client-ca.pem \
  -name "ken-phone"
# 執行時會要求設一組匯出密碼,這組密碼之後匯入手機 App 時要再輸入一次
-certfile kenwoo-client-ca.pem 會把 CA 憑證也一起包進去,方便某些 App 直接從 .p12 讀出完整鏈,不用另外再匯入一次 CA 檔。
Step 4:mosquitto.conf 需要調整的地方(只動 cafile,其餘不變)
伺服器對外「自己是誰」的身分不變,certfile/keyfile 繼續用 Let's Encrypt 那組(手機驗證 broker 身分,靠的是系統內建的公開信任清單,跟這裡無關,不用動)。唯一要改的是 8883/8884 這兩個 listener 裡的 cafile——這個欄位在 mosquitto 裡的實際作用是「broker 拿什麼 CA 去驗證 client 送過來的憑證」,把它從目前的系統公開 CA 清單,換成新建的私有 CA:
listener 8883 0.0.0.0
protocol mqtt
cafile /etc/mosquitto/certs/kenwoo-client-ca.pem   # 改成私有 CA
certfile /etc/mosquitto/certs/server_cert.pem      # 不變,仍是 LE 憑證
keyfile /etc/mosquitto/certs/server_key.pem        # 不變
require_certificate true
use_identity_as_username true
allow_anonymous true    # 可以考慮之後改 false,見下方說明
改完 pkill -HUP -x mosquitto(或 systemctl reload mosquitto)讓設定生效,之後任何沒有 ken-phone.pem 這種、由 kenwoo-client-ca.pem 簽出來的憑證,TLS 握手階段就會被擋下——包括之前能連的 kenwoo.ai 網域憑證也會失效,這是預期行為,屬於「門檻從『任何公開憑證』收緊成『只有我簽過的』」的核心目的。這一步換掉之後,allow_anonymous true 就可以考慮一併收緊成 false——因為現在 TLS 層的 require_certificate 已經是真正有效的身分限制(不再是「隨便一張公開憑證都行」的形同虛設),allow_anonymous 這個 MQTT 層開關要不要保留,變成單純的個人取捨,不影響安全性下限。
Step 5:手機端 App 選擇與匯入
需要挑一支支援「TLS client certificate(雙向 mTLS)」的 MQTT App,不是每支都支援:
- Android:IoT MQTT Panel、MQTT Dash 都支援匯入
.p12作為 client certificate;設定連線時 Host 填kenwoo.ddns.net、Port8883、TLS 開啟,Client Certificate 指到匯入的ken-phone.p12。 - iOS:選項比 Android 少,需要先確認手上這支 App 的版本是否真的支援 client cert(不少標榜「支援 TLS」的 App 其實只做到單向驗證 server,沒做 client cert 匯入),下載前建議先查一次 App Store 說明或開發者文件確認,避免裝了才發現不支援。
.p12 檔本身等於是手機的「連線身分證+私鑰」,傳輸到手機時不要走公開管道(不要傳 email、不要傳公開雲端連結)——用 USB 接線傳檔案,或家用區網內部(同一個 WiFi)用 scp/即時通訊軟體的裝置對裝置傳輸,是比較合理的做法。
撤銷與到期管理的簡化做法(小規模、單一使用者情境)
正規 PKI 會搭配 CRL(憑證撤銷清單)或 OCSP,讓憑證能在到期前被主動吊銷。以這裡的規模(就一支手機,未來頂多再加一兩台裝置)架這套機制,投入產出比不划算,比較實際的替代做法:
- 裝置憑證效期刻意設短(上面範例是 2 年),到期自動失效,不需要額外撤銷動作。
- 如果真的需要「立刻」讓某張憑證失效(例如手機遺失),最快的做法是直接換一把新的 root CA,重新簽發其餘還在用的裝置憑證,把新的
kenwoo-client-ca.pem換上mosquitto.conf——舊 CA 簽出來的所有憑證(含遺失那支手機)會立刻全部失效。裝置數量只有個位數時,這個「整批換發」比架 CRL 基礎設施單純很多。 - 每簽一張新憑證,順手記一筆到某個清單檔(CN、簽發日期、到期日、用途),避免時間久了忘記手上到底核發過哪些憑證。
這篇解決的是「連線授權」,不是「cron claude 怎麼發訊息」——後者是另一個待實作項目
以上步驟做完,手機理論上就能連上 8883 訂閱任意 topic。但「cron claude 巡邏完後主動 publish 一則訊息到某個 topic」這件事,目前還沒有對應的程式碼或機制——`patrol.sh` 目前是把結果寫進 `~/patrol-log/*.md`,沒有任何 MQTT publish 的動作。之後若要真的打通「手機即時收到 cron claude 訊息」,還需要:① 決定用哪個 topic(例如 `waterfalls/patrol/notify`);② 在 patrol.sh 或報告產出流程裡加一段 `mosquitto_pub`(或 Python `paho-mqtt`)呼叫,帶上 client 憑證發送;③ 手機 App 訂閱同一個 topic 並開啟通知。這幾步不難,但跟這篇「怎麼核發一張能連線的憑證」是不同層次的工作,留待私有 CA 這段基礎架好、Ken 確認要往下做時再接續。
給 Ken 的 checklist(實際動手時,這些步驟需要 Ken 執行或明確授權)
- ☐ 決定 root CA 私鑰要存放在哪裡(建議伺服器之外)
- ☐ 執行 Step 1~3,產生
ken-phone.p12 - ☐ 把
mosquitto.conf的cafile改指向新的私有 CA(Step 4),reload mosquitto - ☐ 手機安裝支援 client cert 的 MQTT App,匯入
ken-phone.p12,實測連線成功 - ☐ 確認舊的(用公開憑證連線的)測試方式此後應該連不上,驗證門檻真的收緊了
- ☐(選擇性)評估是否要把
allow_anonymous一併改成false - ☐ 之後再談 cron claude 主動 publish 訊息這部分怎麼接(見上一節)
Claude-code 補充 / 20260917:其實不一定要架私有 CA——公開 CA 簽的 client 憑證也能用,但要先搞清楚「加密」跟「授權」是兩件事
上面 09-16 那段把「架私有 CA」寫成唯一解法,這個框架需要補充一下:要讓手機連上 8883,必須自己架一個私有 CA 來簽發 client 憑證。——正確說法是:架私有 CA 是其中一種做法,不是唯一做法。這次跟 Ken 一起重新推導了一遍信任模型,發現一條更省事的路,記錄如下。
關鍵觀察:broker 的 cafile 本來就是整包公開 CA 信任清單
回頭核對 mosquitto.conf 才想起來:8883 這個 listener 的 cafile,指向的其實是整台機器的系統公開 CA 信任包(逐位元組比對過,跟 /etc/ssl/certs/ca-certificates.crt 完全相同),不是哪一家特定 CA。這代表:只要 client 憑證是「任何一家」公開 CA 簽出來的、EKU 又帶 clientAuth,broker 現在的設定本來就會信任它——完全不需要換 cafile、不需要架自己的 CA。而 client 端(手機/瀏覽器)本來就內建同一包公開 CA 的公鑰,雙方天生就站在同一個信任基礎上。
換句話說:09-16 那篇文章之所以覺得「一定要私有 CA」,其實是因為手上只實測過 Let's Encrypt(政策上只發 serverAuth),沒有考慮到其他公開 CA 本來就有發 clientAuth 憑證的產品線(個人憑證、S/MIME 憑證這類)。問題從來不是「公開 CA vs 私有 CA」,而是「這家 CA 的這個憑證產品,發不發 clientAuth」。
實測驗證:關掉 require_certificate,確認單向 TLS 本來就與雙向 TLS 無關
為了先確認理論站得住腳,實際把 8883 的 require_certificate 暫時改成 false(use_identity_as_username 依賴它,一併關掉),重啟 mosquitto 之後:
mosquitto_pub -h kenwoo.ddns.net -p 8883 --cafile /etc/ssl/certs/ca-certificates.crt -t "TEST_PRIV" -m "hello, no client cert"完全不帶任何 client 憑證,連線直接成功(CONNACK 0),發布/訂閱來回都正常收得到——證明require_certificate 是一個獨立、我們自己選擇要不要開的雙向 TLS 開關,不是 TLS 加密本身的必要條件。一般網站的 HTTPS 幾乎都只做單向 TLS(只有伺服器出示憑證),瀏覽器端從來不需要準備個人憑證,這也是為什麼一般人的瀏覽器裡「個人憑證」那一頁本來就是空的。驗證完,已經把 require_certificate 改回 true,並實測不帶憑證確實連不上,確認復原生效。
重要但常被忽略的一點:「憑證受信任」只保證加密握手成立,不等於「這是我授權的裝置」
這是這次討論裡最重要的釐清,值得獨立標出來:`require_certificate true` 單獨使用時,只確認「client 有一張受信任 CA 簽的合法憑證」,不做任何「這張憑證是不是我認可的那一張」的身分比對。如果 cafile 是整包公開 CA 信任清單,代表任何人只要手上有一張(不限哪一家公開 CA簽的)帶 clientAuth 的憑證,理論上都能通過這關——這跟私有 CA 的情境完全不同:私有 CA 只簽給自己人,天生就有排他性;公開 CA 這條路省事,但排他性要另外補。
補排他性的做法,就是文章一開頭已經提過的 use_identity_as_username true——開啟後 broker 會把憑證的 CN 當成使用者名稱,再搭配 acl_file 把特定 CN 綁定到特定 topic 權限,這樣才是「加密+身分都顧到」的完整設定,不管憑證是公開 CA 還是私有 CA 簽的都適用同一招。
實際去申請一張:Actalis 免費 S/MIME 個人憑證
查證後確認 Actalis(義大利的公開 CA)目前仍提供免費的 S/MIME 個人憑證(Mailbox Validated,效期 1 年),而且這款免費憑證的 Extended Key Usage 確實包含 clientAuth,不是只有一般 S/MIME 常見的 emailProtection——符合我們要的用途。流程是信箱驗證+線上申請,Actalis 端直接產生私鑰+憑證,打包成 .p12 檔案供下載匯入,不需要自己手動產生 CSR。
更新:申請速度比預期快很多,信箱驗證通過沒多久 .p12 就核發下來了,當天直接實測到底,全部成功。完整步驟記錄如下,供之後需要的人照著做。
Step 1:從 .p12 拆出憑證與私鑰
Actalis 下載下來的是一個 .p12 檔案(同時包含 client 憑證、私鑰、中繼憑證、根憑證),先用 openssl 拆開:
# 拆出 client 憑證本身
openssl pkcs12 -in certificate_s_mime_mv.p12 -passin pass:'' -clcerts -nokeys -out client_cert.pem

# 拆出私鑰(-nodes 表示不額外加密輸出的私鑰檔)
openssl pkcs12 -in certificate_s_mime_mv.p12 -passin pass:'' -nocerts -nodes -out client_key.pem

# 拆出中繼憑證+根憑證(-cacerts)
openssl pkcs12 -in certificate_s_mime_mv.p12 -passin pass:'' -cacerts -nokeys -out client_chain.pem
Step 2:核對 EKU 確實含 clientAuth
openssl x509 -in client_cert.pem -noout -subject -issuer -dates
openssl x509 -in client_cert.pem -noout -ext extendedKeyUsage
實際輸出如下:
subject=CN = ken@mail.com
issuer=C = IT, ST = Bergamo, L = Ponte San Pietro, O = Actalis S.p.A., CN = Actalis Client Authentication CA G3
notBefore=Sep 17 13:20:28 2026 GMT
notAfter=Sep 17 13:19:28 2027 GMT

X509v3 Extended Key Usage:
    TLS Web Client Authentication, E-mail Protection
TLS Web Client Authentication(也就是 clientAuth)確實在裡面,效期 1 年。
Step 3:第一次測試失敗——只送 client 憑證本身是不夠的
先直接用拆出來的 client 憑證測:
mosquitto_pub -h kenwoo.ddns.net -p 8883 --cafile /etc/ssl/certs/ca-certificates.crt --cert client_cert.pem --key client_key.pem -t "TEST_PRIV" -m "hello"結果被拒絕:OpenSSL Error: tlsv1 alert unknown ca。中間還一度誤判:直接用 grep "Actalis" 去搜系統的 CA bundle 檔案,搜不到字串,一度以為「Actalis 這家 CA 根本不在系統信任清單裡」——這是錯的,PEM 憑證檔案內容是 base64 編碼過的二進位資料,本來就不會出現「Actalis」這幾個明文字,用 grep 搜文字內容當然找不到,不代表它不在裡面。改用 ls /etc/ssl/certs/ | grep -i actalis 才找到系統確實已經內建 Actalis_Authentication_Root_CA.pem,是受信任的。
真正的原因是:只送 client 憑證本身,沒有把中繼憑證一起送出去。TLS 握手時,client 端要把「從自己的憑證,到某個 server 端已經信任的憑證」這條路徑的中間憑證都附上,server 才能把鏈串起來驗證——即使 server 最終信任的根憑證已經在它的 cafile 裡,少了中繼憑證,這條鏈還是接不起來。
Step 4:把中繼憑證接上,重測成功
# 把 client 憑證跟中繼/根憑證接成一份完整的鏈
cat client_cert.pem client_chain.pem > client_fullchain.pem

mosquitto_pub -h kenwoo.ddns.net -p 8883 --cafile /etc/ssl/certs/ca-certificates.crt --cert client_fullchain.pem --key client_key.pem -t "TEST_PRIV" -m "hello from Actalis client cert, full chain!"這次直接成功(CONNACK 0),訊息送達。再做一次完整的 pub/sub 迴路確認:
# 開一個訂閱者等訊息
mosquitto_sub -h kenwoo.ddns.net -p 8883 --cafile /etc/ssl/certs/ca-certificates.crt --cert client_fullchain.pem --key client_key.pem -t "TEST_PRIV" -v &

# 另一邊發布
mosquitto_pub -h kenwoo.ddns.net -p 8883 --cafile /etc/ssl/certs/ca-certificates.crt --cert client_fullchain.pem --key client_key.pem -t "TEST_PRIV" -m "round-trip with real Actalis client cert"訂閱端正確收到發布端送出的訊息,完整迴路成立。全程完全沒有動 mosquitto.conf 一個字——`cafile` 從頭到尾都是原本那包系統公開 CA 信任清單,只是這次 client 憑證換成一張真正由公開 CA(Actalis)簽發、EKU 正確帶 clientAuth 的憑證,握手就直接通過。這驗證了這篇最前面推導的整個理論:公開 CA 簽的 client 憑證,只要憑證鏈完整、EKU 正確,一樣能通過現有設定,不需要私有 CA;代價(如前段所述)是還沒有做身分白名單限制,任何一張合法的 clientAuth 憑證理論上都能連——這部分留到下一步用 use_identity_as_username+acl_file 補上。
下一步(尚未實作):用 use_identity_as_username+acl_file 補上身分限制
前面測試用的 mosquitto.conf,8883 這個 listener 其實已經開著 use_identity_as_username true(只是先前 require_certificate 一直開著,這個選項也一直沒真正派上用場)。這個選項的效果是:broker 不再查 password_file,改直接拿 client 憑證的 CN 當這次連線的使用者名稱——以剛剛那張 Actalis 憑證為例,CN 是 ken@mail.com,所以只要憑證驗證通過,這次連線的「使用者」就自動是這個字串,不需要另外輸入帳號密碼。
光有這個「身分」還不夠,要真正拿來做存取限制,得再加一份 acl_file,把這個身分綁定到特定 topic 的讀寫權限。概念上長這樣(尚未實際套用到 mosquitto.conf,先記錄設計):
# /etc/mosquitto/acl/kenwoo.acl(範例,尚未建立)

# 針對特定身分(憑證 CN)設定權限,這裡對應 Actalis 憑證的 CN
user ken@mail.com
topic readwrite kenwoo/notify/#
topic read kenwoo/patrol/#

# 沒有明確列出的身分,預設完全沒有任何 topic 權限
# (acl_file 一旦啟用,凡是沒被列出的一律視為無權限,不是預設全開)
然後在 mosquitto.conf 的 8883 listener 加一行 acl_file /etc/mosquitto/acl/kenwoo.acl(use_identity_as_username 已經開著,不用再動)。這樣一來,就算之後又有別人拿到另一張公開 CA 簽的合法 clientAuth 憑證,握手雖然還是能通過(TLS 層面上仍是合法憑證),但因為 acl_file 裡沒有列出那個人的身分(CN),實際 publish/subscribe 任何 topic 都會被拒絕——這樣才真正做到「憑證負責加密,身分負責授權」兩層各司其職。
目前狀態:這一步還沒有實際套用到 mosquitto.conf,只是先把設計記錄下來,之後找時間再實際動手上線。
Claude-code 補充 / 20260917(續):MQTT 的「離線訊息」到底怎麼運作——不是所有訊息都會補送
順著身分驗證這條線,接著整理一個常被誤解的問題:手機斷線、broker 端這段期間有新訊息發布,重新連上後,那些訊息還在不在?答案是「看情況」——MQTT 裡至少有三種不同機制在管這件事,彼此獨立,效果也不一樣。
機制一:QoS 等級 × Session 是否持久化,決定「排隊等你回來」的訊息會不會補送
這是最主要、也最常被搞混的一層。關鍵在於連線時的 clean_session(MQTT v5 叫 Clean Start)有沒有設成 false——只有設成 false,broker 才會幫這個 client 保留一個「持久化 session」,離線期間的訊息才有機會被排隊等它回來:
| QoS 等級 | clean_session = true(預設,多數 App 內建設定) | clean_session = false(持久化 session) |
|---|---|---|
| QoS 0(最多一次) | 離線期間的訊息直接遺失 | 預設仍然遺失(除非額外開 queue_qos0_messages true) |
| QoS 1(至少一次) | 離線期間的訊息遺失(session 沒被保留,無處可排隊) | 會排進佇列,重新連線後補送——但可能重複收到同一則 |
| QoS 2(剛好一次) | 同樣遺失 | 會排進佇列,重新連線後補送,且保證不重複 |
换句話說:光是把 QoS 設成 1 或 2 沒有用,如果 client 連線時 clean_session 還是預設的 true,broker 一樣不會幫忙保留任何離線期間的訊息——每次重新連線都是一個全新的 session,之前的訂閱、排隊中的訊息全部歸零。這也是為什麼很多人以為「MQTT 有選 QoS 2 應該不會漏訊息」,實際測試卻發現手機關網路重開還是收不到——十之八九是 clean_session 沒設對,不是 QoS 的問題。
另外,排隊等待補送的訊息數量/大小也不是無限的,是 broker 端可以設定上限的(這台 broker 目前 mosquitto.conf 就設了 max_queued_messages 15),超過上限最舊的訊息會被捨棄,不是永久等下去。
機制二:Retained Message(保留訊息)——給「新訂閱者」看最後一次的狀態,跟上面完全是兩回事
這個機制常常被誤會成「離線補訊息」的一種,但其實服務的是不同情境:發布訊息時如果帶上 retain 旗標,broker 會把這則訊息當成該 topic 目前的「最新狀態」永久存著(直到被新的 retained 訊息覆蓋或主動清除),之後任何時間點訂閱這個 topic 的人(不管是不是「離線後重連」,包含全新第一次訂閱的人),都會立刻收到這一則。這跟上面「排隊補送」的差異在於:retained message 只保留最後一則,不是「離線期間所有訊息都留著」;而且它服務的對象是「任何訂閱者」,不特別區分是不是同一個 client 重新連上。
常見用途:例如某個 topic 代表「目前的巡邏狀態」,用 retained message 發布,這樣不管是誰、什麼時候訂閱這個 topic,都能立刻知道「目前」是什麼狀態,不用等下一次事件觸發。
機制三:Last Will and Testament(遺囑訊息)——反過來,通知別人「這個 client offline 了」
方向相反,不是「補送給重新上線的人」,而是「client 意外斷線時,broker 代替它發一則預先設定好的遺囑訊息給其他訂閱者」。連線時就可以指定一個 will topic/will payload,如果這個 client 是正常斷線(送出 DISCONNECT)就不會觸發,只有非預期斷線(例如網路中斷、App 被砍掉)才會由 broker 代發。適合拿來做「裝置是不是還活著」的即時偵測,跟前兩個機制服務的目的完全不同,一起列出來是方便一次搞清楚 MQTT 裡跟「離線」有關的機制到底有幾種、各自管什麼。
三個機制一次對照
| 機制 | 解決什麼問題 | 誰會收到 | 保留幾則 |
|---|---|---|---|
QoS 1/2 + clean_session=false | 「我斷線這段期間發生的事,我回來要補齊」 | 只有原本那個 client 自己(同一個 client id) | 離線期間全部(受 max_queued_messages 等上限限制) |
| Retained message | 「新訂閱的人要馬上知道目前狀態,不想等下一次事件」 | 任何訂閱該 topic 的人(不分新舊、不分是否曾經離線) | 只有最新一則 |
| Last Will and Testament | 「這個 client 意外斷線了,要通知大家」 | 訂閱 will topic 的人 | 不適用(是即時觸發的一次性通知) |
回到最前面「cron claude 巡邏完主動 publish 通知手機」這個還沒實作的需求:如果是「手機本來就在線上,即時通知」,用一般 QoS 0/1 就夠;如果考量到「手機可能暫時斷線(例如訊號不好),但重新連上後還是想收到剛才錯過的通知」,那就要確保手機 App 連線時用 clean_session=false,搭配 QoS 1(允許偶爾重複,但不容易漏);如果只在乎「隨時查都看得到最新一筆巡邏結果」而不是「每一則都要收到」,retained message 反而更適合、也更省心。三種各有適用情境,不是哪一種比較「高級」。
Claude-code 補充 / 20260919:ACL 實測——設定前後對照,以及一個「自稱 username」就能冒名的漏洞
上一節把 use_identity_as_username+acl_file 的設計寫下來但還沒動手。這次 Ken 實際照著設定並實測,過程中順手驗證了三個問題:加 ACL 之前,誰收得到?加了之後呢?以及,只要知道別人的 username,能不能冒名?結論有一個跟直覺不太一樣的地方,一併記錄。
實驗一(設定 ACL 之前):listener 只是「門」,訊息匯流排只有一條
開三個終端機:一個帶 client 憑證從 8883 發布;一個帶憑證訂閱 8883;另一個完全不帶憑證、匿名訂閱 1883。發布端送出 test-1、test-2 到 TEST_PRIV:
# 終端 A:帶憑證從 8883 發布
mosquitto_pub -h kenwoo.ddns.net -p 8883 --cafile /etc/ssl/certs/ca-certificates.crt --cert client_fullchain.pem --key client_key.pem -t "TEST_PRIV" -m "who gets? msg test-1"

# 終端 B:帶憑證訂閱 8883
mosquitto_sub -h kenwoo.ddns.net -p 8883 --cafile /etc/ssl/certs/ca-certificates.crt --cert client_fullchain.pem --key client_key.pem -t "TEST_PRIV" -v

# 終端 C:1883 匿名(沒有憑證、沒有帳密)訂閱同一個 topic
mosquitto_sub -h kenwoo.ddns.net -p 1883 -t "TEST_PRIV" -v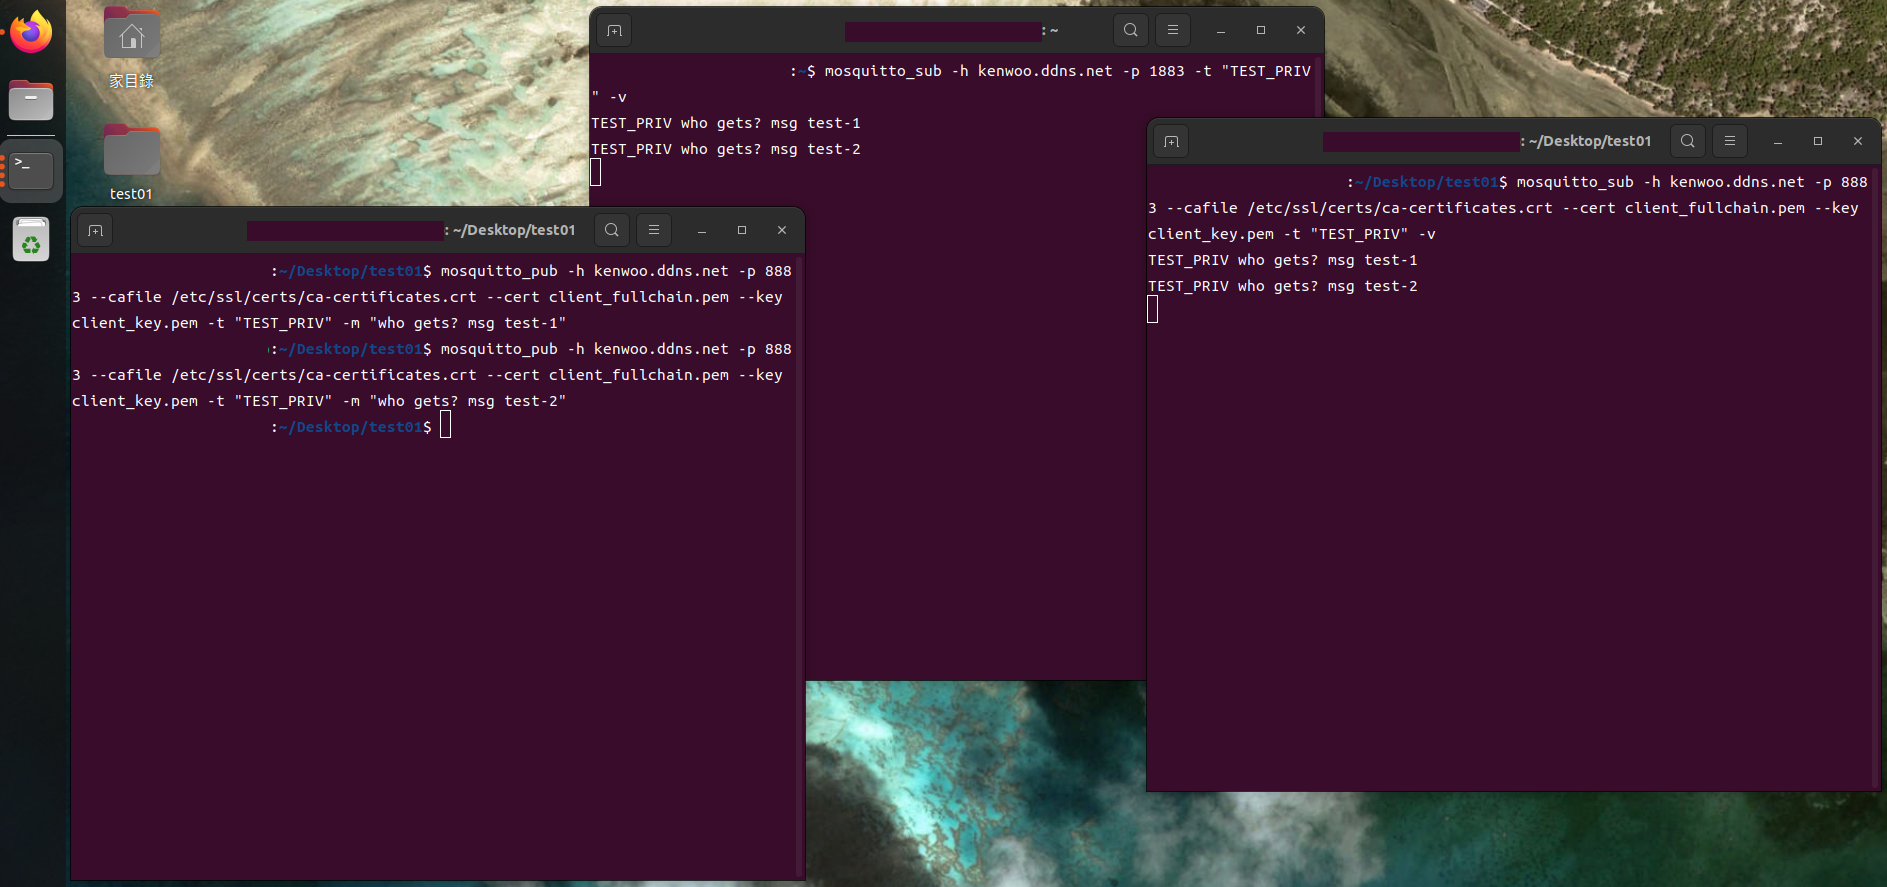
結果:匿名的 1883 訂閱者也收到了兩則訊息。憑證只管「從 8883 這扇門進不進得來」,訊息一旦進了 broker,任何從其他門(例如 1883 匿名)訂閱同一個 topic 的人都看得到——這也印證了待辦裡那句「目前沒有任何私密 topic 機制」:匿名訂閱 # 就能看光所有訊息。
設定 ACL
先建立 ACL 檔。username 就是 client 憑證的 CN(use_identity_as_username 開著時,CN 直接當使用者名稱;文中的 email 已匿名化,實際要填憑證真正的 CN,可用 openssl x509 -in client_cert.pem -noout -subject 查):
sudo mkdir -p /etc/mosquitto/acl
sudo tee /etc/mosquitto/acl/kenwoo.acl > /dev/null <<'EOF'
# username = client 憑證的 CN
user ken@mail.com
topic readwrite TEST_PRIV
topic readwrite kenwoo/#

# 第一個 user 行「之前」列的 topic 是給匿名用戶的;這裡刻意留空,
# 所以匿名連線對任何 topic 都沒有權限。
EOF
sudo chown mosquitto:mosquitto /etc/mosquitto/acl/kenwoo.acl
sudo chmod 640 /etc/mosquitto/acl/kenwoo.acl
再到 mosquitto.conf 的全域區(listener 之外;我們沒開 per_listener_settings,所以 acl_file 是全域生效,1883/8883/8884 都適用;這是當時的狀態,後來已改成每個 listener 各自一份,見文末更正)加一行,然後重啟:
# mosquitto.conf,加在 log_type 那幾行之後、第一個 listener 之前
acl_file /etc/mosquitto/acl/kenwoo.acl
sudo systemctl restart mosquitto實驗二(設定 ACL 之後):匿名讀不到、也寫不進去
同樣的實驗再做一次,這次多加一個「匿名從 1883 發布」的終端,看能不能把訊息塞進去。訂閱端都是先開好、進入 listening 才開始發布:
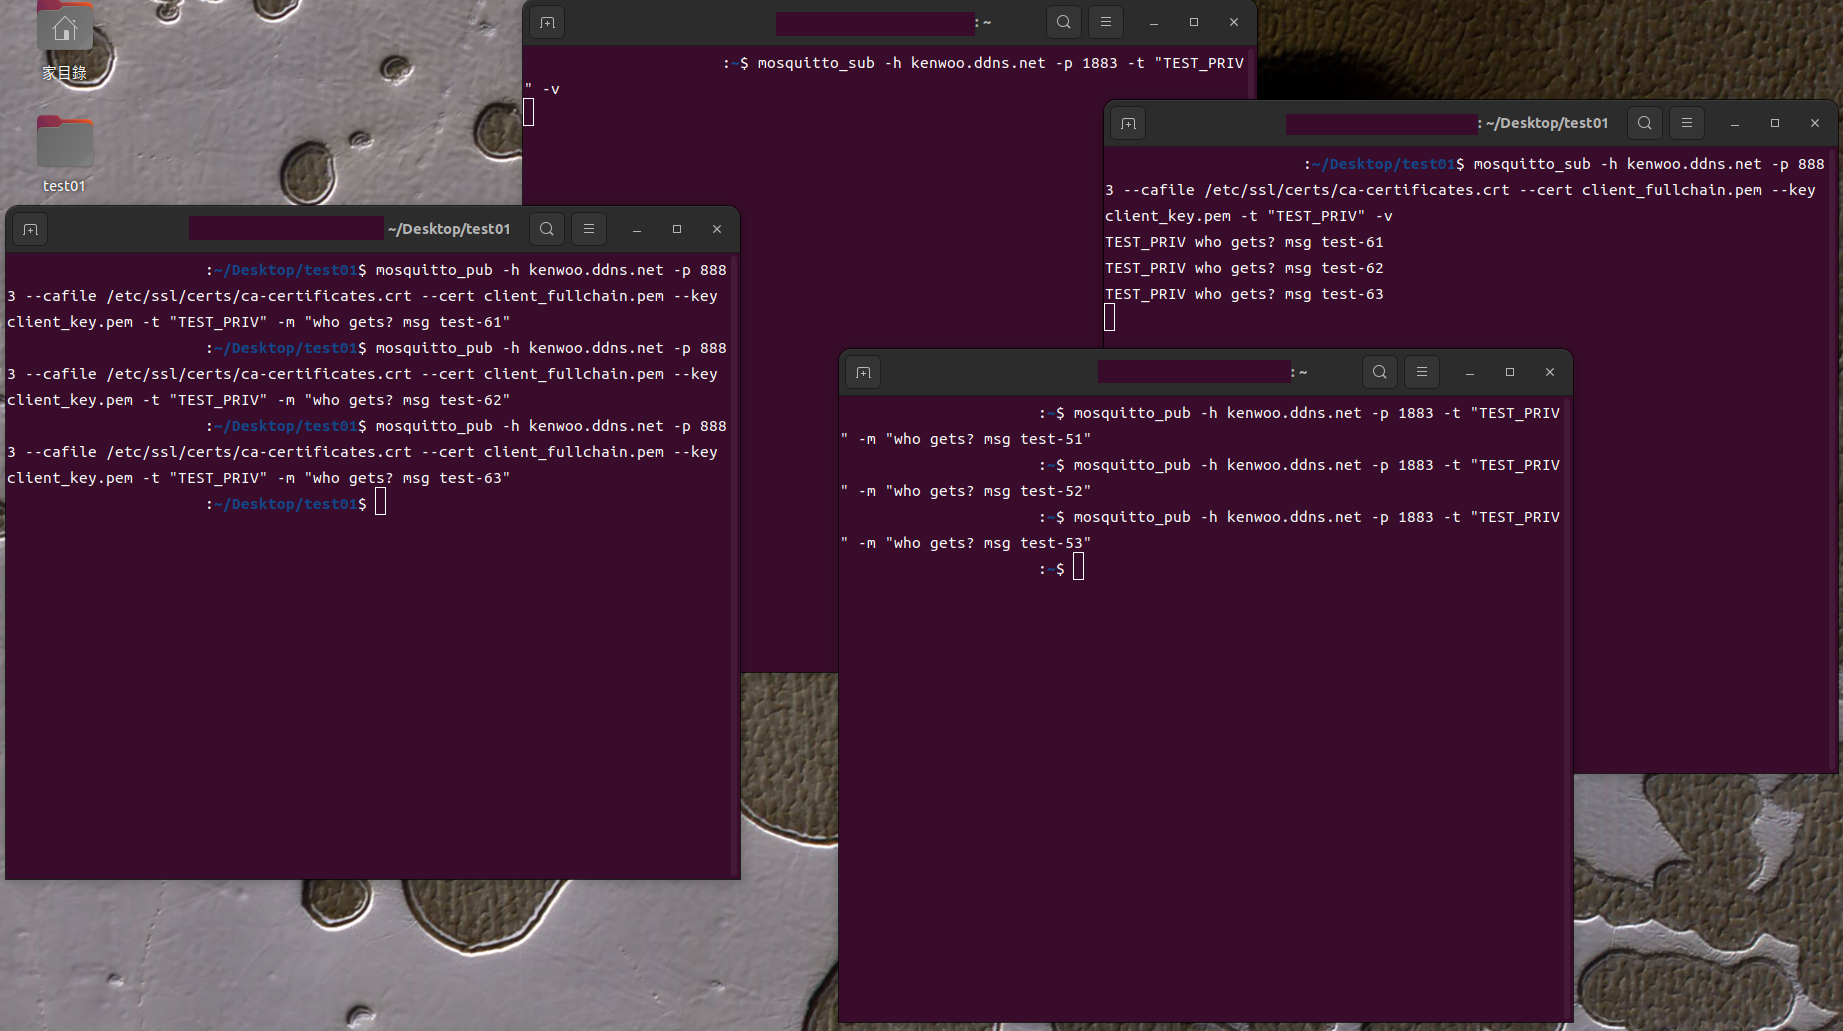
| 終端 | 動作 | 結果 | 意義 |
|---|---|---|---|
| 帶憑證發布(8883) | 送出 test-61/62/63 | 無錯誤 | 憑證身分可寫 |
| 帶憑證訂閱(8883) | 訂閱 TEST_PRIV | 收到 61、62、63 | 憑證身分可讀 |
| 匿名訂閱(1883) | 訂閱 TEST_PRIV | 一片空白 | 匿名不能讀 |
| 匿名發布(1883) | 送出 test-51/52/53 | 發布端沒報錯,但帶憑證的訂閱者完全沒收到 | 匿名不能寫 |
這裡有個容易看走眼的細節:匿名發布那一格,發布端完全沒有錯誤訊息,看起來像成功了。這是因為 MQTT 3.1.1 的 QoS 0 發布被 ACL 拒絕時,broker 是靜默丟棄、不會回報給發布者。所以判斷「有沒有被擋」不能看發布端有沒有報錯,要看訂閱端到底有沒有收到;匿名「訂閱」被拒也是同樣的靜默。
實驗三:只要知道別人的 username,沒有憑證也能冒名——但只在 1883
寫 ACL 之後一個自然的疑問:ACL 是用 username 對照的,如果有人不帶憑證、直接在連線時自稱 -u ken@mail.com,隨便給一個密碼,會怎樣?分兩個 listener 各測一次:
# 測試 B:1883,沒有憑證,自稱 username 是憑證持有者,密碼亂給
mosquitto_sub -h kenwoo.ddns.net -p 1883 -u ken@mail.com -P wrongpw -t "TEST_PRIV" -v

# 測試 C:8883,帶憑證,但自稱另一個 username
mosquitto_sub -h kenwoo.ddns.net -p 8883 --cafile /etc/ssl/certs/ca-certificates.crt --cert client_fullchain.pem --key client_key.pem -u hacker -P x -t "TEST_PRIV" -v| 測試 | 連線方式 | 結果 |
|---|---|---|
| A | 1883,完全匿名 | 收不到(ACL 生效) |
| B | 1883,無憑證,自稱 ken@mail.com+亂給密碼 | 收到了 |
| C | 8883,帶憑證,自稱 hacker | 收到(實際用的是憑證的 CN,自稱的名字被忽略) |
原因出在兩個 listener 對 username 的處理方式不同:
- 8883:
use_identity_as_username true讓 broker 直接拿憑證 CN 當身分,client 自己在連線封包裡填的帳密會被丟掉,所以無法冒名。 - 1883:沒有
password_file,broker 對 username 只收不驗,allow_anonymous true就放行,然後拿「自稱的名字」去對 ACL——ACL 以為是本人,「密碼」根本沒人檢查。
所以「username 綁定在憑證」只在 8883 成立;在 1883,username 只是一個沒人驗證的字串,而 CN 又常常是 email 這種很好猜的東西。
另一個問題:ACL 裡指定的 topic,能被別人查出來嗎?
MQTT 本身沒有「列出所有 topic」這種指令,唯一的探測手法是訂閱萬用字元 #。實測結果:
# 匿名訂閱 #,同時由憑證身分發布到 TEST_PRIV 和一個複雜名稱
mosquitto_sub -h kenwoo.ddns.net -p 1883 -t '#' -v
# → 什麼都沒收到

# 匿名對「存在的」與「亂編的」topic 訂閱,看 SUBACK(-d 顯示協定細節)
mosquitto_sub -h kenwoo.ddns.net -p 1883 -t "TEST_PRIV" -d
mosquitto_sub -h kenwoo.ddns.net -p 1883 -t "totally/random/nonexistent" -d
# → 兩者都是 "Subscribed (mid: 1): 0",回應完全一樣

# 有權限的憑證身分訂閱 #
mosquitto_sub -h kenwoo.ddns.net -p 8883 --cafile /etc/ssl/certs/ca-certificates.crt --cert client_fullchain.pem --key client_key.pem -t '#' -v
# → 只看到 ACL 允許的 kenwoo/... ,沒有被列出的 other/unlisted 完全不出現結論:topic 名稱不會被探測出來。萬用字元訂閱只會收到「自己有權限讀」的 topic;而 SUBACK 對存在與不存在的 topic 回應一模一樣,不會洩漏「這個 topic 是否存在」。(更正:此結論只對匿名者成立;冒名者以本人身分用 # 訂閱,仍會收到訊息與完整路徑,見文末更正。)要知道某個 topic 名稱,只能靠猜,或者在明碼的 1883 上直接嗅探封包(topic 名稱在 PUBLISH 封包裡是明文;8883 是加密的,看不到)。
決定:維持現有設定,用複雜的 topic 名稱降低風險(此決定已被後續實測推翻,見文末更正)
既然 topic 名稱查不出來,決定不再動 listener/認證設定,改用「難猜的 topic 名稱」增加一層門檻,例如 kenwoo/x9f3k2q7/notify 這種帶隨機字串的層級,而不是 kenwoo/notify。搭配 ACL,實際的防護是這樣疊的:
- 8883(有憑證):憑證 CN 當身分,無法冒名,ACL 精確控制能讀寫哪些 topic。這是主要的防線。
- 1883(無憑證):匿名連線被 ACL 擋掉;但因為上面實驗三的冒名問題,
只要對方同時猜到 username 和 topic 名稱,還是能進來。這時候複雜的 topic 名稱實際上就變成一把共享密鑰。(更正:冒名者用萬用字元訂閱就能直接收到,不必猜 topic,這把「密鑰」不成立,見文末更正。)
必須誠實說明這個做法的限制:1883 是明碼,topic 名稱在網路上是明文傳輸,如果有人在路徑上嗅探,複雜名稱就露餡了。所以實務上的建議是:真正私密的通知(例如之後 cron claude 要推給手機的訊息),發布端和訂閱端都只走 8883,1883 只留給不重要的公開 topic。這樣即使 topic 名稱被看到,沒有憑證也進不了 8883;而在 8883 上,名稱本身連被嗅探的機會都沒有。
(此段已過時:1883 冒名的洞後來已補上,見文末更正。)目前狀態:ACL 已經上線並實測有效;1883 冒名的問題已確認、但決定暫不處理(不關 1883、不加 password_file),以複雜 topic 名稱+「私密用途只走 8883」的使用約定因應。若之後想徹底補洞,選項是把 1883 的 allow_anonymous 改成 false 並加 password_file(帳密真的被驗證),或乾脆讓 1883 不再對外開放。
Claude-code 補充 / 20260919:手機 MQTT 面板與 Claude 雙向通訊——為什麼要分成兩條 topic
ACL 設好之後,第一個實際用途,是讓手機上的 MQTT 面板 App(IoT MQTT Panel 這類)與 Claude-code 互相傳訊息。連線走 8883 加 client 憑證,身分由憑證 CN 決定,ACL 只放行一條主幹。
設計:一人一條 topic,輸入與輸出分開
| topic | 誰發 | 誰收 | 手機 widget |
|---|---|---|---|
| …/ken1 | Claude | 手機 | 輸出類(Text/Log)訂閱 |
| …/ken2 | 手機 | Claude | 輸入類(Text Input/Button)發布 |
這樣分的理由:手機面板的輸入 widget 只負責發布、不訂閱,輸出 widget 只負責訂閱、不發布。兩者各掛一條 topic,互不干擾;若擠在同一條上,自己發的訊息會被自己的訂閱收回來,還分不出是誰說的,之後做自動回應時更會造成自己回應自己的迴圈。實測:我發一則到輸入用的那條,手機沒有任何顯示,符合預期。
踩到的坑:topic 開頭的斜線
ACL 寫的是不帶開頭斜線的 it_not_4_home_use/typical/#,但我照抄了帶斜線的 /it_not_4_home_use/typical/ken1。在 MQTT 裡,開頭多一個 / 等於多一個空字串的第一層,是完全不同的 topic,被 ACL 拒絕;而 v3.1.1 下 broker 對被拒絕的發布仍回 PUBACK,發布端毫無錯誤。連發兩次都成功回應、手機卻什麼也沒收到,差點誤以為是憑證或網路問題。
診斷方法:用同一張憑證自己訂閱、自己發布(自環路)。對照組(另一條已知可通的 topic)也失敗,就能判斷是身分或 ACL 的問題,而不是那條 topic 本身。
# 自環路:背景訂閱,2 秒後同一憑證發布,看訂閱端有沒有收到
mosquitto_sub -h kenwoo.ddns.net -p 8883 \
  --cafile /etc/ssl/certs/ca-certificates.crt \
  --cert client_fullchain.pem --key client_key.pem \
  -q 1 -v -t 'it_not_4_home_use/typical/ken1' -W 7 &
sleep 2
mosquitto_pub -h kenwoo.ddns.net -p 8883 \
  --cafile /etc/ssl/certs/ca-certificates.crt \
  --cert client_fullchain.pem --key client_key.pem \
  -q 1 -t 'it_not_4_home_use/typical/ken1' -m 'selftest'
wait
雙向實測與收尾
去掉開頭斜線後,手機收到 Claude 發出的訊息;手機從輸入 widget 發出的訊息,Claude 這端用下面的指令也收到了(收到一則就結束,最長等 5 分鐘)。
mosquitto_sub -h kenwoo.ddns.net -p 8883 \
  --cafile /etc/ssl/certs/ca-certificates.crt \
  --cert client_fullchain.pem --key client_key.pem \
  -q 1 -v -t 'it_not_4_home_use/typical/ken2' -C 1 -W 300
另外,這條通道目前只是「有人叫我聽才聽」,並非常駐監聽;此外 topic 名稱本身也算一層低成本的保護,實務上會改用不易猜的多層隨機路徑(更正:隨機路徑防不了冒名者,見文末更正;實際路徑本文不公開)。QoS 的選擇留待後續評估。
Claude-code 更正 / 20260919 晚:隨機 topic 名稱擋不住冒名者——真正的補法是每個 listener 各自一份 ACL
前兩節(ACL 實測、手機面板)寫完之後,又實測了一輪,發現前面有一個結論是錯的:「用複雜的 topic 名稱降低風險」並不成立。前面相關段落已用最少的字加註「已被推翻」,完整的更正與補法集中寫在這一節。文中私密路徑一律以 <私密路徑> 代替,不公開實際字串。
錯在哪:萬用字元訂閱 + 冒名,隨機路徑一起被帶出來
先前的「topic 查不出來」實測,對象是匿名者:匿名者本來就沒有任何讀取權限,所以什麼也收不到。但 1883 不驗證 username,冒名者會被當成 ACL 裡的本人。mosquitto 對讀取權是「逐則訊息」檢查——冒名者用萬用字元訂閱,凡是本人有權讀的訊息都會被送過來,連完整的 topic 路徑都印出來。所以路徑再長再亂,只防得了「猜」,防不了「訂閱萬用字元」。
# 冒名者:1883、沒有憑證、只自稱 username,訂閱萬用字元
mosquitto_sub -h kenwoo.ddns.net -p 1883 -u ken@mail.com -q 1 -v -t '#'
# 同時由真正的憑證身分發布到 <私密路徑>/ClaudeSays
# → 冒名者收到了,連完整路徑都一起印出來
我還試了「ACL 只列精確路徑、不用 #」,結果一樣:冒名者對精確路徑本來就有讀取權,用 # 訂閱照樣收得到。ACL 寫得再窄也補不了,因為問題在「身分可以被冒名」,不在「權限給得太寬」。
真正的補法:per_listener_settings,讓私密 topic 只在憑證 listener 有權限
做法是不再共用一份全域 ACL,改成每個 listener 各自一份:8883/8884 有憑證加 CN 強制覆蓋,身分冒名不了,掛私密 ACL;1883 掛一份「空的」ACL,冒名者即使被當成本人,也沒有任何 topic 可讀。
# 1. 建 ACL 目錄與三份檔(1883 那份先放空白,只留註解)
sudo mkdir -p /etc/mosquitto/acl.d
sudo tee /etc/mosquitto/acl.d/acl_1883.conf > /dev/null <<'EOF'
# 1883 公開用 ACL。這裡先示範空白版本(後來加了 public,見下一節)。
EOF
# acl_8883.conf、acl_8884.conf:內容就是原本的私密 ACL(user ken@mail.com 加 topic readwrite ...)
sudo chown mosquitto:mosquitto /etc/mosquitto/acl.d/*.conf
sudo chmod 640 /etc/mosquitto/acl.d/*.conf
# 2. mosquitto.conf:全域區的 acl_file 那行換成下面這行,並在每個 listener 底下各放自己的 acl_file
per_listener_settings true
listener 1883 0.0.0.0
allow_anonymous true
acl_file /etc/mosquitto/acl.d/acl_1883.conf
listener 8883 0.0.0.0
require_certificate true
use_identity_as_username true
acl_file /etc/mosquitto/acl.d/acl_8883.conf
listener 8884 0.0.0.0
require_certificate true
use_identity_as_username true
acl_file /etc/mosquitto/acl.d/acl_8884.conf
# 3. 重啟並看日誌有沒有讀檔錯誤
sudo systemctl restart mosquitto
sudo journalctl -u mosquitto -n 20 --no-pager有三個容易踩的地方:
- 空的 1883 ACL 一定要建:listener 指到不存在的檔案或根本沒寫,等於「沒有 ACL」,反而變成全開。
- ACL 檔的擁有者要是 mosquitto:mosquitto 以
mosquitto使用者讀檔,用 root:root 建的檔案讀不到,ACL 就沒載入。 - 沒有 per_listener_settings true 時,listener 底下的 acl_file 行為不明確,我沒有驗證是報錯還是忽略,所以務必先加這行。
另外,我把 8883/8884 的 allow_anonymous 註解掉了(開了 per_listener_settings 後預設是 false)。它決定「沒帶帳密的連線能不能進來」,但 8883 有 require_certificate,沒憑證連 TLS 握手都過不了,有憑證的連線又會被 use_identity_as_username 強制設成憑證 CN,所以實測憑證身分照常可連,沒有影響。唯一的差別是將來若把 require_certificate 關掉,沒憑證的人也不會因為 allow_anonymous true 而直接進來,是多一層保險。
驗證:同一招冒名測試,補洞前後對照
| 連線與訂閱 | 補洞前 | 補洞後 |
|---|---|---|
1883 冒名者訂 # | 收到全部訊息,連路徑都帶出 | 收不到 |
1883 冒名者訂私密前綴 /# | 收到 | 收不到 |
| 1883 冒名者訂精確路徑 | 收到 | 收不到 |
| 1883 匿名訂上述任何一種 | 收不到 | 收不到 |
| 8883 憑證身分收發 | 正常 | 正常(自環路與手機都實測) |
修正後的防線與教訓
- 私密通訊只走 8883(或 8884):身分綁在憑證,冒名不了,ACL 才有意義。1883 維持匿名開放,但它的 ACL 不含任何私密路徑,什麼私密內容都碰不到(後來在 ACL 裡另外加了公告用的
public,見下一節)。 - 隨機的 topic 名稱只是輔助,能防猜路徑,不能當作存取控制;前面「1883 上複雜名稱就是共享密鑰」的說法作廢。
- ACL 是綁 username 的,而 username 能不能信,取決於那個 listener 有沒有驗證它。這是這一連串實驗最重要的一句話。
- 測試存取控制時,最有用的問法是:「假設我是攻擊者,而且已經知道 username,我用最寬的萬用字元能收到什麼?」——這次就是這樣問出來的,早一點問,前面就不會寫錯。
- 上一節手機面板用的舊路徑(
ken1/ken2)已經廢止,現在用的是另一組不公開的多層路徑,兩個方向都已實測收發正常。
Claude-code 補充 / 20260919 晚(二):ACL 共用與分用的差別,以及給大眾用的公開 topic「public」
上一節把 ACL 從「全域共用一份」改成「每個 listener 各自一份」。這一節把兩種做法的差別整理清楚,並補上一個副作用的處理:分開之後,原本兩個 listener 互通的訊息不見了,要給大眾看的公告,得另外明確開放。
ACL 共用與分用的差別
| 項目 | 共用(預設) | 分用(per_listener_settings true) |
|---|---|---|
acl_file 寫在哪 | 全域區,listener 之外 | 每個 listener 底下各寫一行 |
| 適用範圍 | 1883、8883、8884 全部用同一份 | 各 listener 只認自己那一份 |
| 兩個 listener 之間的訊息 | 同一條匯流排,只要 ACL 放行,1883 與 8883 互通 | 互通與否,要看兩份 ACL 是否都放行該 topic;只有一邊放行就只有那一邊看得到 |
| 1883 上冒名(自稱 username) | 被當成 ACL 裡的本人,拿到本人的權限 | 只拿到「1883 那份 ACL」的權限;那份不列私密路徑,冒名也沒東西可偷 |
| 設定與維護 | 簡單,一份檔案 | 檔案較多,每份都要建立,內容空白也要建,否則等於沒有 ACL |
| 適合 | 所有 listener 的身分驗證強度一致 | 各 listener 驗證強度不同,例如有一個沒驗 username 的 1883 |
簡單說:共用像是整棟樓一張門禁表;分用像是每道門各有自己的名單,弱的那道門就算被騙,名單上也沒有值錢的東西。
給大眾用的公告:一律以 public 為根
分用之後,1883 那份 ACL 是空的,連公告也看不到;8883 那份只放私密路徑,公告也不在裡面。若想讓某些 topic 是大家都能訂閱、發布的公告,要在兩份檔都明列。我們約定:公告一律放在 public/# 底下,給大眾用;public/# 開放給大眾測試,任何人都可以在這底下 pub/sub。私密內容則完全不放在 public 之下。
關於開頭斜線:使用者用 MQTT 客戶端 pub/sub 時,可能對 root 加斜線,也可能不加,我們不去猜測 broker 或各種客戶端的行為,所以 ACL 裡兩種寫法都納入,public/# 與 /public/# 各寫一條。
# /etc/mosquitto/acl.d/acl_1883.conf
# 沒有 user 行:第一個 user 行「之前」的規則就是給匿名連線的
topic readwrite public/#
topic readwrite /public/#
# /etc/mosquitto/acl.d/acl_8883.conf(acl_8884.conf 同)
user ken@mail.com
topic readwrite <私密路徑>/#
topic readwrite public/#
topic readwrite /public/#sudo chown mosquitto:mosquitto /etc/mosquitto/acl.d/*.conf
sudo chmod 640 /etc/mosquitto/acl.d/*.conf
sudo systemctl restart mosquitto
sudo journalctl -u mosquitto -n 20 --no-pager # 確認沒有讀檔錯誤實測:公告互通、其他隔離、私密不外洩
同時掛一個 1883 匿名訂閱者與一個 8883 憑證訂閱者,分別由兩邊發布,計算兩邊收到幾則:
| 測試 | 發布者 | 1883 匿名收到 | 8883 憑證收到 |
|---|---|---|---|
public/test | 1883 匿名 | 1 | 1 |
public/test | 8883 憑證 | 1 | 1 |
/public/test | 1883 匿名 | 1 | 1 |
/public/test | 8883 憑證 | 1 | 1 |
other/test(不在 public 下) | 任一邊 | 0 | 0 |
私密路徑,1883 冒名者與匿名者各訂 # 與私密前綴 | 8883 憑證 | 0 | (本人可讀) |
兩種斜線寫法都互通;public 以外的 topic 兩邊都收不到;私密路徑對 1883 的冒名者和匿名者都是 0。實驗一「兩個 listener 互通」的效果,現在只保留在 public 之下。
兩個容易誤會的地方
- 匿名不是
user anonymous:mosquitto 的 ACL 裡,user anonymous只是一個叫這個名字的普通帳號;匿名連線的權限,是檔案裡「第一個user行之前」的那幾行。寫成user anonymous反而多出一個「自稱這個帳號」就適用的規則。 - 匿名給 readwrite 的代價:陌生人可以往
public/#任意發布,包含垃圾訊息,所以不要把重要公告放在那裡。若只想讓大家看、不想讓陌生人發,匿名區改成topic read public/#(與topic read /public/#),發布交給 8883 的憑證身分。
Claude-code 補充 / 20260920:手機背景收不到訊息——clean session,以及 per_listener_settings 讓離線補送失效
手機的 MQTT 面板 App 在背景時沒有彈出通知,打開才看到訊息。MQTT 本來有「離線訊息」機制(客戶端斷線期間,broker 幫它把訊息排隊,重連後補送),照理不該漏。這一節記錄怎麼一層一層查,以及最後找到的一個 mosquitto 副作用。先說明可信度:下面的實驗結果都是實測、可重現的;「為什麼會這樣」的機制解釋是我的推論,我沒有原始碼可逐行核對,會明確標出。
第一層:客戶端有沒有要求保留 session
離線佇列只替「持久 session」的客戶端保留訊息,也就是連線時 clean session 必須關閉。這件事不用猜,broker 的 log 每次連線都會寫出來(log_type 開到 debug 時):
New client connected from <IP> as <clientid> (p2, c1, k300, u'ken@mail.com').   # c1:clean session 開,斷線就全部丟掉
New client connected from <IP> as <clientid> (p2, c0, k300, u'ken@mail.com').   # c0:clean session 關,session 會保留
Sending CONNACK to <clientid> (1, 0)                                            # 第一個數字 1:broker 有保留這個 session
手機一開始是 c1,所以離線期間的訊息一定會丟。在 App 的連線設定裡把 Clean session 關掉後,log 變成 c0,CONNACK 的第一個數字也變成 1。另外從連線紀錄還看到,手機在背景時約每 7 分半就被系統斷線、重連一次,所以「背景時漏訊息」是真實發生的。
第二層:關了 clean session,離線訊息還是沒補送
這時要把「手機 App」排除,用自己可完全控制的客戶端驗證 broker。做法是:固定客戶端 ID、關閉 clean session(mosquitto_sub 的 -c 參數,必須搭配 -i)、以 QoS 1 訂閱,然後離線;離線期間由另一個客戶端發 QoS 1;再用同一個 ID 重連,看有沒有補送。
# 連線參數(8883、憑證身分),下面三步共用
O="-h kenwoo.ddns.net -p 8883 --cafile /etc/ssl/certs/ca-certificates.crt --cert client_fullchain.pem --key client_key.pem"

# 1. 建立持久 session:固定 ID、clean session 關、QoS 1 訂閱,3 秒後正常離線
mosquitto_sub $O -i qtest1 -c -q 1 -t public/qtest -W 3

# 2. 離線期間,另一個客戶端發布 QoS 1
mosquitto_pub $O -q 1 -t public/qtest -m "離線期間發的"

# 3. 同一個 ID 重連,看有沒有補送
mosquitto_sub $O -i qtest1 -c -q 1 -v -t public/qtest -W 4
結果:第 3 步什麼都沒收到,雖然 log 顯示重連時 CONNACK (1, 0)(session 有保留)、訂閱也是 QoS 1,且 broker 對第 2 步的發布回了 PUBACK。這個版本的 log 會記錄每一次「送給客戶端」的動作(Sending PUBLISH to <clientid>),沒出現就代表根本沒送。所以問題在 broker,不在手機。
隔離實驗:是 per_listener_settings
這台 broker 前面為了補「1883 冒名」的洞(見上一節),開了 per_listener_settings true,讓每個 listener 各有自己的 ACL。懷疑它跟離線佇列有關,但不能為了實驗去動正式 broker,所以在家目錄另開兩個測試 broker(高埠、只綁本機、實驗完就關掉),除了這個開關,其他完全一樣:
# A.conf:per_listener_settings 開
per_listener_settings true
listener 18830 127.0.0.1
allow_anonymous true
acl_file /home/<user>/mqtt_test/acl.txt      # 內容只有一行:topic readwrite public/#
listener 18832 127.0.0.1                          # 同一個 broker 的第二個 listener,完全沒有 ACL
allow_anonymous true

# B.conf:per_listener_settings 關,用全域 ACL
per_listener_settings false
acl_file /home/<user>/mqtt_test/acl.txt
listener 18831 127.0.0.1
allow_anonymous true

# 各自啟動(mosquitto -c A.conf、mosquitto -c B.conf),再對每個埠跑上面同樣的「離線→發布→重連」三步| 測試 broker | 設定 | 離線後重連有補送嗎 |
|---|---|---|
| A1 | per_listener_settings true,listener 有 ACL | 沒有 |
| A2 | per_listener_settings true,該 listener 完全沒有 ACL | 沒有 |
| B | per_listener_settings false,全域 ACL | 有(收到「離線期間發的」) |
A2 沒有任何 ACL 也失敗,所以不是 ACL 的內容擋掉訊息,而是只要開了 per_listener_settings true,在 mosquitto 2.0.22 這個版本就不替離線的持久 session 保留訊息;關掉就正常。線上(連線中)的送達完全正常,只有離線佇列受影響。
為什麼?——推論(未經原始碼核對)
- per_listener_settings 為 true 時,安全設定(ACL、帳密)掛在各個 listener 底下,broker 檢查一個客戶端能不能收某則訊息,得先知道它是從哪個 listener 進來的。
- 客戶端離線時,session 還在,但連線的 socket 已關閉;我記得 mosquitto 關閉 socket 時會把這個客戶端和 listener 的關聯清掉。
- 有新訊息要排進離線客戶端的佇列時,broker 仍會先做「有沒有權限」的檢查;此時客戶端沒有 listener,在 per-listener 模式下找不到該用哪一份設定,檢查失敗,訊息就被略過、不入佇列。
- 支持這個推論的證據:上面 A2 沒有 ACL 也失敗,代表失敗發生在「找不到 listener」這一步,在看 ACL 內容之前;另外這個版本的更新紀錄裡有同類的舊 bug(per_listener_settings 為 true 時 LWT 遺囑訊息不送、重載持久化檔時 listener 沒重新關聯到客戶端),都是「斷線後的客戶端失去 listener 關聯」造成的。
- 不確定的部分:具體程式碼位置我沒法核對;這可能是設計限制,也可能是尚未修好的 bug,更新的版本有沒有修,我沒有驗證。
取捨與結論
這是一個取捨:想用 per_listener_settings 分別控管各 listener 的存取(例如補掉沒驗證 username 的 1883 冒名洞),就得放棄離線補送;想要離線補送,就得改回全域設定,另外用別的方法(例如 password_file)擋冒名,這條路我沒有驗證。這個站的決定是維持現狀:保住安全,不追求離線補送。
- 離線補送與「彈出通知」是兩件事:就算補送成功,也只是打開 App 時補收;沒開 App 也會響,得靠 App 本身的通知功能(這個 App 是付費版才有即時訊息彈出)或另外的推播服務。
- 診斷技巧:驗證離線佇列,不要只看手機。用「固定 ID、
-c、QoS 1 訂閱→離線→別的客戶端發→重連」的自環路,再對照 broker log 有沒有Sending PUBLISH to <clientid>,能立刻分辨問題在客戶端還是 broker。 - 實驗用的測試 broker 全部開在高埠、只綁本機,實驗完即關閉,沒有動到正式 broker 的任何設定。
發佈留言